
Part 1 – Introduction : What is WaaS?
Part 2 – Windows 10 Updates.
Part 3 – Servicing Channels.
Part 4 – Servicing Tools.
Part 5 – “Getting Current and Staying Current”
Part 6 – “Putting it all together”
Part 7.1 – Introduction to Desktop Analytics
Part 7.2 – Onboarding Desktop Analytics
Part 7.3 – An Overview of Deployment Plans
Part 7.4 – Integrating Desktop Analytics with Configuration Manager
We’ve investigated in Parts 5 and 6 Windows as a Service and how to pick a cadence that is suitable to your organization’s needs. With the addition of Desktop Analytics, how can it help staying on top of the WaaS?
One thing to note is that when you create a Deployment Plan in MEM DA, a new folder hierarchy is automatically created in your MEM Configuration Manager’s Assets and Compliance node. Under Device Collections, you’ll find a new folder called ‘Deployment Plans’ and it’ll have 2 sub folders: ‘Pilot’ and ‘Production’.

In addition, a Pilot and a Production collection are also automatically created in your MEM Configuration Manager and you’ll find them in their respective folder. The collections’ name is based on the Deployment Plan name that you have created in the MEM DA portal and either ‘(Pilot)’ or ‘(Production)’ is appended.


DO NOT make any changes to this collection as it is not supported.
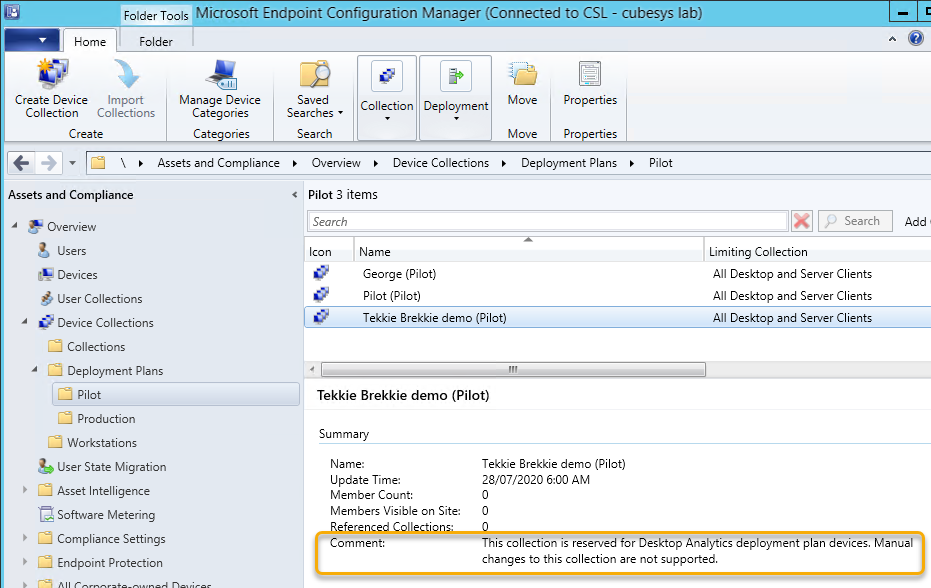
However, you can use this collection as a limiting collection for child collections and you’ll be able to make any changes there.
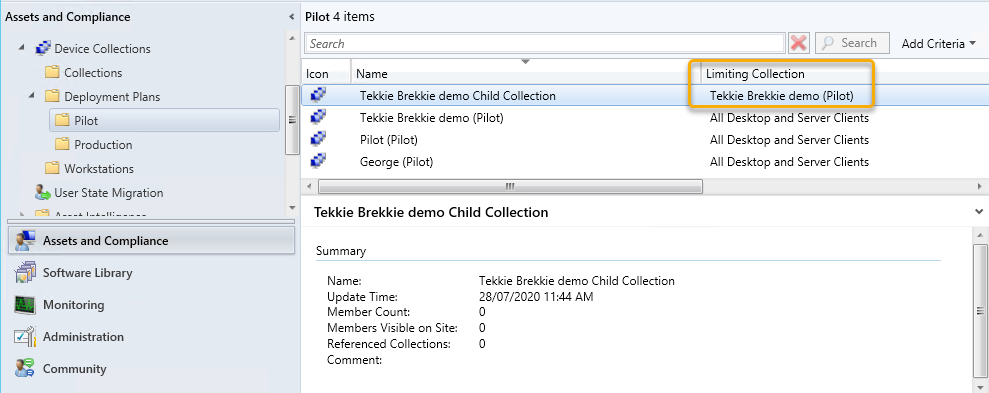
Tip: You might want to create several child collections that would be equivalent to phased deployments of a particular WaaS deployment ring. For instance, you could have 3 sub collections of your Pilot collection. Then you can use the Phased Deployment feature to have more control over the deployment to your Pilot devices in 3 phases. This would also be a great rehearsal for when you decide to deploy to the rest of the estate.
As discussed in part 7.3, the Prepare phase in Desktop Analytics does not marry up with the Insider Preview ring. However, we can still make it fit in a WaaS process and depending on your organisation’s size, process, standards, etc., below are a few steps to get your environment ready followed by a table to map the DA phases with the WaaS Rings.
First, you need to have a collection with all your managed devices. You also need to create 2 collections in Configuration Manager: 1 that will have all the devices that you want to include in your Pilot and another collection that will have all the devices you want to exclude. Additionally, create a collection that will contain Windows 10 Insider Preview devices.
Second, make sure you have configured the Desktop Analytics Azure Service app in Configuration Manager with the Target and the Additional Collections as we’ve seen in Part 7.2 – Onboarding Desktop Analytics. In the Additional collections, make sure you include your Pilot inclusion and Pilot exclusion collections.
Note: You do not have to add your insider preview collection.
In the Desktop Analytics portal, once all the collections have synchronized, tick ‘include’ for the Pilot inclusion collection and tick ‘exclude’ for the Pilot exclusion collection. Leave the collection with the all the managed devices as is.
Create a Deployment Plan for a specific Windows 10 target build and select the collection that has all your devices. You do not need to include the Pilot inclusion or the Pilot exclusion collections in your Deployment Plan’s group of devices to include; Desktop Analytics will automatically recognize which devices that are members of the all managed devices collections have to be included or excluded from the Pilot and Broad deployment phases.
In Configuration Manager, once synchronization has completed, you’ll see the above-mentioned folder hierarchy created in Assets and Compliance under the Device Collections node. In the Pilot folder, you’ll find a collection for the Pilot phase of your Deployment Plan and, in the Production folder, you’ll also find a collection for the Broad phase of your Deployment Plan.
Once you have all this setup, here’s a suggestion on how to map the Desktop Analytics Deployment Plan phases to the Windows as a Service Deployment Rings:
| WaaS Rings | DA Phases | Comments |
|---|---|---|
| Insider Preview | N/A | 4 to 5 months prior to a Feature Update is Generally Available, enrol a few VMs with the Insider Preview program and start evaluating it. Create fortnightly or monthly evaluation meetings to not only discuss the Insider Previews but also to hold yourself accountable as to the progress leading up to the GA release. |
| Prepare | A month or 2 before the Feature Update is Generally Available, make sure you enrolled the parent collection of your targeted MEM CM managed devices to MEM DA. Check for any connectivity issues from the MEM CM connection health node and mitigate as necessary (‘Unable to enrol’, ‘Configuration Alert’, ‘Awaiting enrolment’, etc.). Note: Depending on your organization’s requirements, choose a suitable and realistic target deployment completion date taking into consideration the support life cycle of each release. Refer to Part 6 – “Putting it all together”. From the results in MEM DA, give yourself a couple of months to investigate any apps that have been flagged as having a potential issue and set the apps’ Importance and Upgrade Decision levels; this will help in getting Pilot devices ready for your pilot. Then, identify which devices you’ll include in your pilot on top of your own selection using the MEM DA AI recommended devices. Before moving on to the Pilot phase, decide on whether you’ll be deploying a Feature update or an In-Place Upgrade Task Sequence from MEM CM (or from Windows Update for Business if you are using Intune in a co-managed environment). Note: As of this writing, you cannot have Intune native devices report to Desktop Analytics. The devices must have the Configuration Manager client installed to report back to DA. How you deploy the Feature and Quality updates can be done using either MEM CM or Intune. Note: Schedule fortnightly or monthly meetings to monitor the progression of your apps and device drivers’ investigations. In the MEM DA portal, make note of this using the Importance and the Upgrade Decision for each asset. | |
| Pilot | Pilot | At this point, after investigating each asset that required a review, the Feature Update has been GA’d for about 2 months. Deploy the feature update using your selected method(s) to your Pilot collection; Remember: you can use the Phased Deployments in MEM CM and I would recommend it as it would be a good exercise to have a practice run before you start deploying to production. Again, have fortnightly or monthly meetings to monitor the progression of your upgrade. In MEM DA, verify the progression of the Pilot deployment and look for any issues related to your apps or device drivers and take the required steps to mitigate these issues. For all apps and device drivers, don’t forget to set the Importance and the Upgrade Decision of each as this will be reflected in the MEM DA Deploy phase. Note: Depending on whether you are deploying the March or the September update release (or both), how quickly you have deployed the update, the feedback you get from the users, the number of issues that may (or may not) have been reported, how quickly you were able to resolve them, etc. the Pilot phase can take anywhere from 2 weeks (that’s VERY short) to 6 months. |
| Broad | Deploy | By now, your deployment confidence level should be very high, and you are ready to deploy the new Feature Update to the rest of your organization. If you use Phased Deployments, you should already have an idea of how many devices you are upgrading per cycle. Whether you are deploying the March or the September build, you’ll be focusing on the Broad deployment for about 2 to 3 months before the next build is GA’d. So, make good use of this time to: * Have weekly, fortnightly or monthly meetings to monitor the success of your deployments. * Have your Insider Preview team get ready for the next build. * In MEM DA, verify the progression of the Broad deployment and look for any issues related to your apps or device drivers * Take the required steps to mitigate any issues. |
Note: You can create 1 phased deployment that includes both your Pilot and the Broad deployment devices. This is the ‘Red Button’ approach discussed in Part 5 – “Getting Current and Staying Current”. At any point in time you can manually ‘Pause’ the deployment (right click on the phased deployment and select pause) and resume once you’ve mitigated any issues.
Note: While you are in the middle of a Phased Deployment, pause the deployment only if you have issues that can be a problem to a large portion of your device fleet; that’s when you hit the ‘Red Button’. If you have an issue that’s going to affect a few devices (say less than 2% of your fleet), or that’s going to affect business critical devices, only then should you stop the deployment process.
Next week, we’ll discuss network bandwidth control. What are the technologies available out there from Configuration Manager and from Windows (10 and Server) that will allow you so manage how content is delivered efficiently.
Stay tuned!