For someone who often gets questionable emails, applications and files sent to them. The Windows Sandbox feature is worthwhile. It allows me to provision a system in isolated environment where I can open the bad attachment or untrusted application. “Isolated” means that the app will run without accessing to files, Registry and other resources of you main Windows OS. Once you close the Sandbox, it will automatically erase all the data associated with it.
This article will run you through the basics of getting it installed and running.
Enable Windows Sandbox on Windows 11
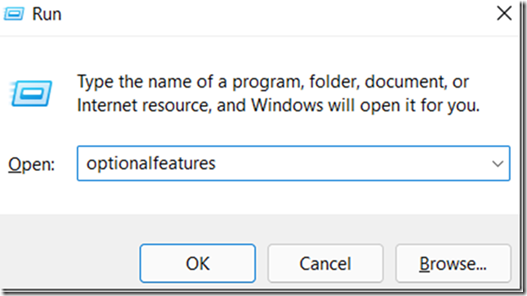
1. From the RUN prompt go to OptionalFeatures
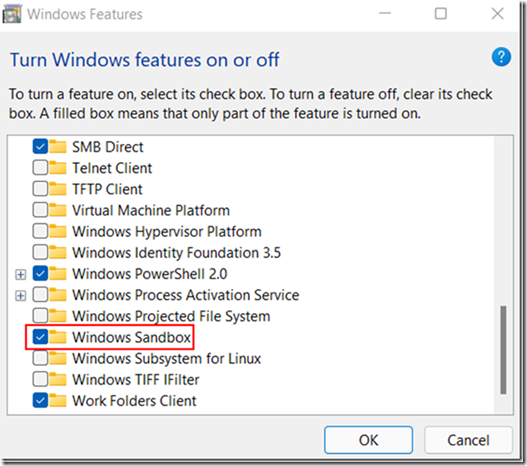
2. Once the Windows Features have populated scroll down to find Windows Sandbox and select it
3. Wait for the installation to complete and then go ahead and reboot your computer
Using Windows Sandbox
Now you’ve got Sandbox installed, it’s time to start using it.
1. Open the Start Menu and find Windows Sandbox
2. Copy and Paste is allowed from the Host to the Sandbox, so copy the app or file you want from the host machine
3. Switch to the Windows Sandbox window and paste the file. Also, you can directly download an app or file using the Edge browser in the Sandbox session.
4. Run the app in Sandbox by clicking on the file you’ve just pasted.
5. After you checked and tested the app, you can just close the Sandbox window. Its session will be removed, and all the associated data will be destroyed.
You’re done, you’ve now successfully Installed Windows Sandbox, run Sandbox and executed your untrusted app or file with protection for you day to day Windows 11 Environment.


